Sometimes when you get handed something new and interesting, you have two choices; you either put it away or you start tinkering over it. If you like tinkering over new and interesting gadgets, you will soon learn one or two things about it (even become good at something).
That is exactly what happened to me when I was first given a Raspberry Pi 2 two years ago by the head of our department.
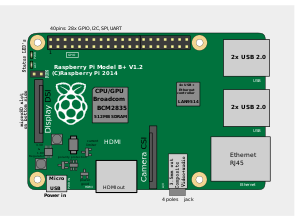
Raspberry Pi 2
•Small computer
•Make, learn, design in a fun way
•Quad core CPU
•1 GB RAM (Pi 2)
•40pin GPIO
•Micro SD slot
•4 USB ports, HDMI, Stereo output, DSI display
•Micro USB power source
Where to get started
The internet is full of fun projects you can do with Raspberry Pi. Some projects are very basic while some are more advanced and require a few more additional equipment apart from the basic kit. Here are just a few sites that could get you started:
- Hackster.io
- PiMyLifeUp (very interesting name)
- Life Hacker's top 10 projects
Now you need a few things to get started with this simple project.
- Raspberry Pi 2 kit
- Breadboard
- 220 Ohm Resistors
- Jumper wires 22 gauge (at some point I used jumper wires from the fan I pulled out from an old PC and modified for this purpose)
- Some LED lights
All the explanation and steps are done in the video above. Here's what I did after following the video.
 |
| The breadboard connected to the Pi |
 |
| The coding in python within Raspbian |
 |
| The 3 lights turn on/off at intervals |
 |
| One laptop I watched the video while following |
 |
| The pin out diagram for the Raspberry Pi GPIOs |
 |
| The 3 LED lights connected to the resistors and then to Pin 6,7,11,12 |
 |
| The code required to turn the LEDs on at intervals of 5 seconds |
😇😉😀💻💾💿📀


No comments:
Post a Comment